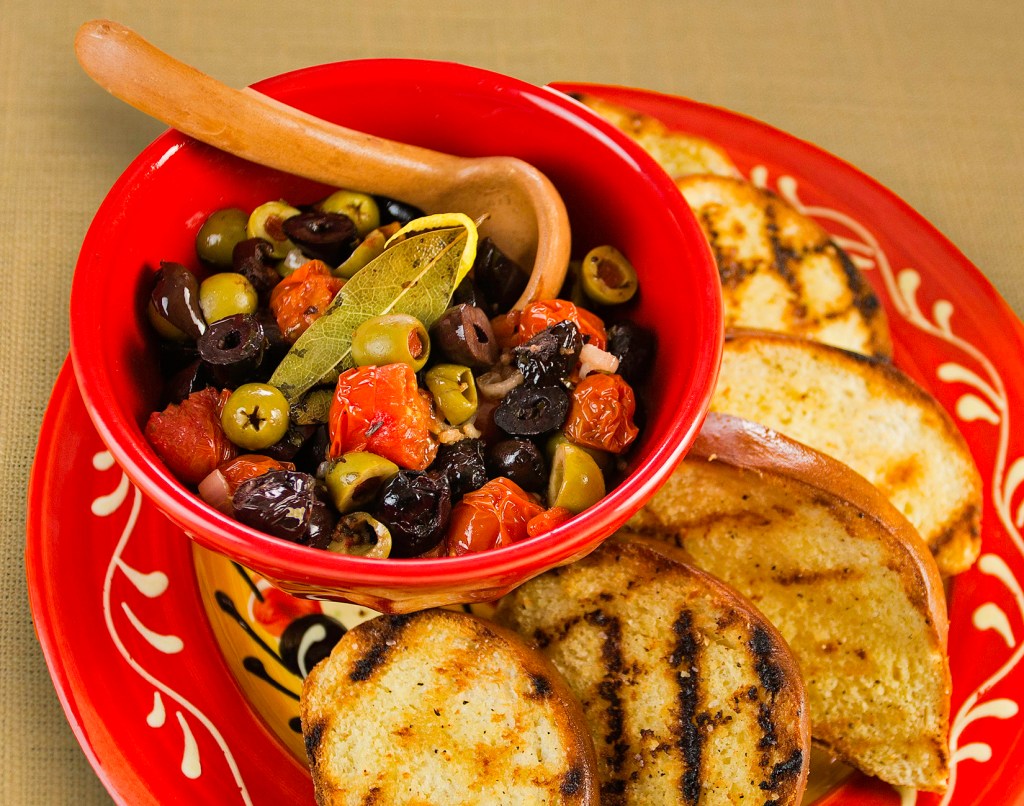
Baked Olives and Grilled Bread

It has been a long time since I posted anything on my blog.  Thanks to one of my blog followers that was at a “Gail’s Pizza Parties” last week who told me she really liked my blog posts and misses them, I am now dedicated to returning to blogging and adding new recipes weekly!

I thought I would share my recipes from “Cookin’ For A Livin'”, a cookbook developed by myself, my boss at the time, Pete Friedman, and an amazing photographer, Jon Hunter.

Cookin For a Living Intro30012018_3

Baked Olives & Grilled Bread is one of my favorite recipes that I developed in the lab/kitchen.  Not only is it an easy dish to prepare, it is also very colorful and healthy!

Cookin For a Living Intro30012018_2

Buon Appetito!


Succulent Shrimp Cocktail

Shrimp cocktail is one of the easiest things to make.  Most people make one basic mistake at home, they overcook the shrimp.   Follow these easy directions and you will always have the most succulent shrimp!

1 lb. 21-25 count AMERICAN Shrimp (the count # is how many shrimp in one pound), peeled & deveined
1 tablespoon Webers® Boston Bay Seasoning
2 cups cold water
Ice bath (ice cubes & cold water)
½ cup shredded lettuce (for plating)
Lemon wedges for garnish, if desired

Ice Bath for Shrimp

Ice Bath For Shrimp

Cocktail Sauce:

½ cup ketchup
¼ cup horseradish
Juice of ½ a lemon
2-3 dashes of tobasco sauce
1 teaspoon Webers ® Boston Bay Seasoning

Place the water and Boston Bay Seasoning in a medium sized sauce pan over high heat.  Bring to a boil.  Immediately add the shrimp.  Cover and cook for 2-3 minutes.  Drain shrimp and place into the ice bath (this prevents further cooking).  Drain the shrimp when cooled (about 30-60 seconds).  Place in the refrigerator until ready to use.

In a small mixing bowl add all the cocktail sauce ingredients, mix until well blended.  Refrigerate until ready to serve.

To serve:  Place shredded lettuce in cocktail glass, top with shrimp, and drizzle with cocktail sauce.  This recipe serves 4.

The

What You Will Need

Years ago I started working as a cooking instructor at The Viking Cooking School in Memphis, TN.  I learned so many great things about cooking, styles, techniques, short cuts, knife skills, etc.  But one of my favorite things that I learned was how to cook the best steak at home.  We always use to go out for steak, Ruth’s Chris was our favorite steakhouse.  I can proudly say that we haven’t been back there in many years.  Once again, you too can make the best steak ever at home.  You only need a few ingredients for the steak, but I like to add a wine reduction sauce with mushrooms as well.

There are several key techniques for making the best steak at home:

  • Start with “USDA Prime Beef” Filet (yes, it’s worth the $$$)
  • Take steaks out of the refrigerator at least an hour before cooking
  • Wrap steak(s) with butchers twine (sold in every grocery store)
  • Season steaks 30 minutes before cooking
  • Generously rub steaks with extra virgin olive oil
  • Use good quality sea salt (I like grey and pink)
  • Freshly ground peppercorns are a must!
  • Prepare grill 30 minutes in advance
  • Bring grill up to the hottest temperature possible before cooking steaks
    Hottest Temperature

    Hottest Temperature

    Grilling Steaks

    Grilling Steaks

  • Use a meat thermometer!  (Unless you’ve been cooking steaks for a while and can tell their doneness using the “touch” technique.
  • Let the cooked steaks rest!  Cover with aluminum foil for 3-5 minutes, this prevents juices from escaping and keeps the meat moist and flavorful.

    Let Steaks Rest

    Let Steaks Rest

Portobello Mushroom Sauce:Deglaze Pan with Brandy

You'll never go back to your favorite steakhouse again!

You’ll never go back to your favorite steakhouse again!

Buon Appetito!

Buon Appetito!

Succulent Shrimp Cocktail and the “Perfect” Filet Mignon” – July & August Calendar Photos


Live at 9 – Rob’s Favorite Char-Grilled Oysters

I just LOVE taking pictures of my food and then upload them to Facebook.  Some people call this “food porn”….I call it “sweet temptations”.  One of my favorite photos is my char-grilled oysters.  I just wish I enjoyed eating oysters….but we won’t go there.  People always find it funny that I can make something taste so good when I won’t even eat it.  You just need to know which flavors go with what.  I suppose I have been blessed with this ability.

This is a very easy take on the famous “Drago’s Charbroiled Oysters” from New Orleans.  In this recipe, I steam open the oysters.  If you choose this method, be careful not to over steam them.  If possible, open them raw.

Char-Grilled Oysters

Char-Grilled Oysters

1 dozen oysters, steamed open*

Compound Butter

1 ½ sticks butter
⅓ to ½ cup parmesan cheese
¼ cup fresh flat leaf parsley
2 cloves garlic, whole
½ teaspoon Spice Islands® Lemon Pepper

Prepare compound butter:

Place butter in the bowl of a food processor and process until smooth.  Add remaining ingredients and process until well combined, scraping down the bowl as needed.  Divide butter into 12 pieces, 1 tablespoon each, for topping on oysters.  Remaining butter can be kept frozen for up to 6 months.
Heat the grill to medium high.

Place oysters on the grill, shell side down.  Cover grill and cook oysters for 2-3 minutes.  Place on tablespoon butter on top of each oyster.  Cover grill and continue cooking an additional 2-3 minutes.

*To clean, place oysters in a colander in and rinse under cold running water.  If necessary, scrub off any mud and debris with a scrub brush.


For Roasted Red Pepper Hummus Recipe, Fruit Kabob Flag, Cucumber Boat and Yellow Squash Goose, click on the link below:

More Recipes

Char-Grilled Oysters

Char-Grilled Oysters

Buon Appetito!


Happy 4th of July!  And what a great time of the year to share with friends and family over some yummy ribs, salads, watermelon, and whatever else you like on this wonderful holiday.  My son, Rob, is our families official rib cooker, but since his relocation to Colorado I’ve had to try and come up with my own recipe/style of cooking ribs.  I hope you enjoy them, remember, low and slow…..

The rub:

2 tablespoons brown sugar
1 teaspoon garlic powder
1 teaspoon onion The Rubpowder
2 teaspoons Weber® Smokey Mesquite Seasoning
1 teaspoon Spice Islands® Smoked Paprika
½ teaspoon Spice Islands® Cayenne Pepper
½ teaspoon Spice Islands® Pasilla Chili Powder
½ teaspoon Spice Islands® Chipotle Chili Powder
½ teaspoon kosher or sea salt

Rinse ribs and remove the membrane from the rack of ribs using a paper towel.

Remove the Membrane


Sprinkle ribs with rub.

Sprinkle ribs with rub

Wrap ribs in foil and place in refrigerator overnight, if possible, or at least for 60 minutes.

Prepare the grill:
Preheat your grill to 225°, try and maintain this heat throughout the entire cooking process. Place a smoke box (filled with soaked chips) directly over the coals.

Remove ribs from foil and place on grill, but not directly over the coals.* Smoke ribs for 2-3 hours for baby back ribs and 3-4 hours for Saint Louis style ribs. Remove ribs from grill and wrap in foil (this will prevent ribs from drying out). Continue smoking the ribs (adding additional wood chips as needed) until the ribs are done (check doneness by bending the ribs, if they bend easy, they are ready, if not, go grab a beer and come back later).

Memphis BBQ Ribs

Bon Appetito!

Memphis Style BBQ Ribs

1 Rack Ribs, Baby Back

Rub:
2 tablespoons brown sugar
1 teaspoon garlic powder
1 teaspoon onion powder
2 teaspoons Weber® Smokey Mesquite Seasoning
1 teaspoon Spice Islands® Smoked Paprika
½ teaspoon Spice Islands® Cayenne Pepper
½ teaspoon Spice Islands® Pasilla Chili Powder
½ teaspoon Spice Islands® Chipotle Chili Powder
½ teaspoon kosher or sea salt

Ribs:
Rinse ribs and remove the membrane from the rack of ribs using a paper towel.
Combine rub and sprinkle on both sides of ribs.
Wrap ribs in foil and place in refrigerator overnight, if possible, or at least for 60 minutes.

Prepare the grill:
Preheat your grill to 225°, try and maintain this heat throughout the entire cooking process. Place a smoke box (filled with soaked chips) directly over the coals.

Remove ribs from foil and place on grill, but not directly over the coals.* Smoke ribs for 2-3 hours for baby back ribs and 3-4 hours for Saint Louis style ribs. Remove ribs from grill and wrap in foil (this will prevent ribs from drying out). Continue smoking the ribs (adding additional wood chips as needed) until the ribs are done (check doneness by bending the ribs, if they bend easy, they are ready, if not, go grab a beer and come back later).

Brush your favorite sauce on top of ribs, cook an additional 2-3 minutes and remove ribs from grill.

*Great website with lots of information regarding ribs…
http://amazingribs.com/recipes/porknography/best_BBQ_ribs_ever.html

Memphis Style BBQ Ribs


WREG “Live at 9” – Making Fresh Mozzarella & Grilled Caprese Sandwiches

Fresh Mozzarella

1 pound fresh mozzarella curd*
6 cups water
3 tablespoons kosher salt

Slice the curd into thin slivers and place in a large mixing bowl.

Bring 6 cups of water to a boil over high heat, add the salt and bring back to the boil.

Gently pour enough boiling water over the curd to cover, let it sit for a few minutes to temper the curd. Use 2 wooden spoons to gently gather the curd together in the center of the bowl. Use the spoons to scoop the mass out of the water and hold it above the bowl, allowing the weight of the cheese to cause it to stretch back down to the water. Repeat lifting the cheese and letting it stretch until it looks smooth and shiny.

To shape the cheese, lift the cheese out of the water and roll it into a tight ball. Pinch the bottom of the ball to seal the seam. The surface of the ball should be smooth and shiny.

Place the form balls into an ice-water bath to cool. If more flavor is desired, salt can be added to the water bath.

Wrap finished mozzarella balls highly in plastic wrap. Serve within 24 hours for optimum flavor and texture.

*Mozzarella curd is available at specialty cheese shops, or on the web at www.goldenagecheese.com.

Grilled Caprese Sandwiches

Yield: 4 sandwiches
Prep time: 10 minutes
Grill time: 4 minutes

8 slices Italian Bread
¼ cup fresh basil leaves, stems removed
2 tablespoons pine nuts
¼ cup Mazola® Extra Virgin Olive Oil
2 roma tomatoes, sliced
8 ounces fresh mozzarella, sliced
Salt & pepper to taste


Combine the basil and pine nuts in a food processor and pulse until coarsely chopped. Add the oil and process until fully incorporated and smooth.

Brush pesto mixture on one side of each slice of bread. Layer tomatoes on 4 slices and add salt and pepper to taste. Top with mozzarella slices and remaining bread slices; firmly press sandwiches together.

On a preheated grill over medium high heat, place sandwiches on an angle and cover (close grill cover if grilling outside or use either a pan lid or a metal bowl, inverted, if grilling inside). Cook 2 minutes, rotate 90° and continue cooking an additional 2 minutes, covered. Flip sandwiches over and repeat process as above. Serve on a bed of leafy greens, if desired.

Grilled Caprese Sandwiches

Buon Appetito!


Thank you all for supporting my blog…2014 in review. 2015 will be even bigger and better!

The WordPress.com stats helper monkeys prepared a 2014 annual report for this blog.

Here’s an excerpt:

The concert hall at the Sydney Opera House holds 2,700 people. This blog was viewed about 11,000 times in 2014. If it were a concert at Sydney Opera House, it would take about 4 sold-out performances for that many people to see it.

Click here to see the complete report.


2015 Galena’s Cucina Calendars

Just in time for the holidays, the perfect gift for that “foodie” in your life.  Monthly recipes along with beautiful photos.  Now available for ordering, first 25 orders will receive a free recipe collection. Special price of $12.95 plus shipping and handling.

Deliveries will be available after November 20, 2014.  Click on the “Order Form” to place your order.

Order Form

Galena's Cucina 2015 Calendars

Galena’s Cucina 2015 Calendars